Installation of Intel Media SDK
Intel Media SDK
Attention
Use of the Intel Media SDK will become deprecated in the future. It will be replaced with the use of the FFmpeg Libraries), so next to tiled thumbnail generation for frame accurate capture and content conditioning as well.
The Intel Media SDK represents a cross-platform API that consists of a set of libraries and tools to get fast video playback, encoding and processing to applications. The Unified Streaming Platform uses several libraries from the SDK to enable transcoding.
Using the Intel Media SDK, videos and audio can be software transcoded (only on Windows) or with hardware acceleration (on both Windows and Linux). The latter can speed up the process considerably, but has specific hardware requirements, in particular a supported Intel CPU with integrated GPU. Therefore, if you want to use hardware acceleration, we recommend you to use an off-the-shelf product like Artesyn's SharpStreamer.
Note that even for software-only transcoding (on Windows), an Intel CPU of at least the Haswell generation is required. AMD CPUs are not supported at all.
Note
When referring to Intel Media SDK names and terms, the version numbers and asset links are subject to change.
Windows 10 / 2016 Server
The basic prerequisite for installing the Intel Media SDK on Windows is a physical or virtual machine running Windows 10 or Windows Server 2016. It must be 64-bit. For any additional requirements, please refer to Intel's documentation.
To start, download the free edition of the Intel Media SDK, version 2018 R2 or later, from Intel's web site:
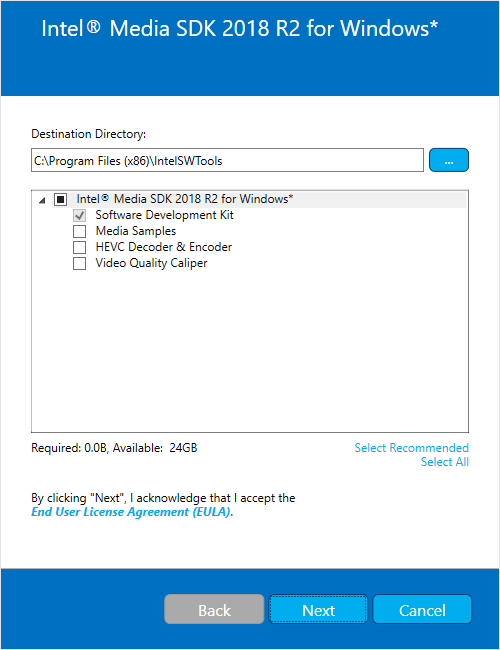
When installing, only the SDK (Software Development Kit) component is necessary. Please uncheck any other options, like shown below:
When the installer prompts you to reboot, please do so. Once up and running
again you may install the 64-bit Windows version of Unified Capture. If both the
installation of the Intel Media SDK and Capture were successful, using the
--frame_accurate parameter on your command line will produce frame accurate
clips when specifying the begin and end times using the t=-parameter. For
example:
#!/bin/bash

unified_capture -v 3 \
  -o clip1.ismv \
  --frame_accurate \
  "https://demo.unified-streaming.com/k8s/features/stable/video/tears-of-steel/tears-of-steel.ism/Manifest?t=00:00:00.000-00:04:00.000"
Ubuntu 20.04 - Intel Media SDK (2020)
As of approximately 2018, Intel has released most of the Intel Media SDK for Linux as open source, under the MIT license [1], and no longer supports or ships their own prepackaged Intel Media SDK distributions for Linux.
The open source version only supports hardware acceleration, so an Intel GPU is required, and neither virtualization nor containerization (e.g. Docker) are supported. (Note that for Docker, there appear to be ways to get it working, but discussing these are outside the scope of this document.)
Ubuntu 20.04 LTS [2] is currently the first long-term support release that comes with a prepackaged and supported Intel Media SDK runtime, and the required Intel Media VA Driver [3]. From now on, this is the only supported Linux configuration for transcoding with Unified Capture.
System requirements
Intel Core CPU with embedded GPU, of the Broadwell architecture or later (a.k.a. 5th generation Intel Core). See also Intel's github site.
Ubuntu 20.04 LTS
At least 8GB of RAM
Installation instructions
First, perform a minimal installation of Ubuntu 20.04 LTS. If no console access is needed, we recommend using the Server Edition, which uses less disk space, and does not contain a full GUI by default.
Then install the Media SDK runtime library, known as libmfx1, and a number
of prerequisites, using the apt-get command:
#!/bin/bash

sudo apt-get -q -y update
sudo apt-get -q -y install intel-media-va-driver-non-free libmfx1 libva-drm2 vainfo
Explanation:
The
libmfx1package contains the Intel Media SDK shared library.The
intel-media-va-driver-non-freepackage contains the full-featured Intel Media Driver for VA-API (Video Acceleration API).The
libva-drm2package contains the DRM runtime library for VA-API, which is required when programs cannot access the VA-API via an X11 server (i.e. when a GUI desktop environment is used).The
vainfopackage contains a utility program to display information from the VA-API driver installed in the system.
After these packages have been installed, verify that VA-API support is working,
by running the vainfo command, which should show output similar to the
following:
#!/bin/bash

$ sudo vainfo
error: XDG_RUNTIME_DIR not set in the environment.
error: can't connect to X server!
libva info: VA-API version 1.7.0
libva info: Trying to open /usr/lib/x86_64-linux-gnu/dri/iHD_drv_video.so
libva info: Found init function __vaDriverInit_1_7
libva info: va_openDriver() returns 0
vainfo: VA-API version: 1.7 (libva 2.6.0)
vainfo: Driver version: Intel iHD driver for Intel(R) Gen Graphics - 20.1.1 ()
vainfo: Supported profile and entrypoints
      VAProfileNone                   : VAEntrypointVideoProc
      VAProfileNone                   : VAEntrypointStats
      VAProfileMPEG2Simple            : VAEntrypointVLD
      VAProfileMPEG2Simple            : VAEntrypointEncSlice
      VAProfileMPEG2Main              : VAEntrypointVLD
      VAProfileMPEG2Main              : VAEntrypointEncSlice
      VAProfileH264Main               : VAEntrypointVLD
      VAProfileH264Main               : VAEntrypointEncSlice
      VAProfileH264Main               : VAEntrypointFEI
      VAProfileH264Main               : VAEntrypointEncSliceLP
      VAProfileH264High               : VAEntrypointVLD
      VAProfileH264High               : VAEntrypointEncSlice
      VAProfileH264High               : VAEntrypointFEI
      VAProfileH264High               : VAEntrypointEncSliceLP
      VAProfileVC1Simple              : VAEntrypointVLD
      VAProfileVC1Main                : VAEntrypointVLD
      VAProfileVC1Advanced            : VAEntrypointVLD
      VAProfileJPEGBaseline           : VAEntrypointVLD
      VAProfileJPEGBaseline           : VAEntrypointEncPicture
      VAProfileH264ConstrainedBaseline: VAEntrypointVLD
      VAProfileH264ConstrainedBaseline: VAEntrypointEncSlice
      VAProfileH264ConstrainedBaseline: VAEntrypointFEI
      VAProfileH264ConstrainedBaseline: VAEntrypointEncSliceLP
      VAProfileVP8Version0_3          : VAEntrypointVLD
      VAProfileVP8Version0_3          : VAEntrypointEncSlice
      VAProfileHEVCMain               : VAEntrypointVLD
      VAProfileHEVCMain               : VAEntrypointEncSlice
      VAProfileHEVCMain               : VAEntrypointFEI
      VAProfileHEVCMain10             : VAEntrypointVLD
      VAProfileHEVCMain10             : VAEntrypointEncSlice
      VAProfileVP9Profile0            : VAEntrypointVLD
      VAProfileVP9Profile2            : VAEntrypointVLD
Specifically, the list of supported profiles and entrypoints should contain all the different H264 variants. If any of the profiles are missing, re-check your setup and try again.
Note that the initial two error messages (about XDG_RUNTIME_DIR and the X
server) are caused by running from a console or ssh session, so they are normal,
and can be ignored.
Testing with Unified Capture
After vainfo has shown that the VA-API driver and runtime are working
correctly, you can proceed to install mp4split (Installation).
After you have done that, you should test your setup with Unified Capture in frame accurate mode, by running the following command:
#!/bin/bash

sudo unified_capture -v 3 \
  -o /dev/null \
  --frame_accurate \
  "https://demo.unified-streaming.com/k8s/features/stable/video/tears-of-steel/tears-of-steel.ism/Manifest?t=00:01:00.000-00:01:05.000"
The outcome of the capture run should contain parts like the following, which mention "adding keyframe":
I0.614 track 1: adding keyframe for splice point(s) 00:01:05.000000(650000000/10000000) to sample at 00:01:05.000000(650000000/10000000) (original gop: 00:01:04.000000(640000000/10000000) to 00:01:08.000000(680000000/10000000))
I0.616 Intel QuickSync (hardware 1.32)
I0.617 Loading libva for HW transcoding
I0.617 Setting Media SDK VADisplay handle
libva info: VA-API version 1.7.0
libva info: Trying to open /usr/lib/x86_64-linux-gnu/dri/iHD_drv_video.so
libva info: Found init function __vaDriverInit_1_7
libva info: va_openDriver() returns 0
I0.621 video_encoder_avc_mfx: encoding to avc profile=66 compatibility=192 level=13 bitrate=401000/441100
I0.626 video_decoder_avc_mfx: switching to sample description index 1: vide/avc1 dref=1 bitrate=401000/441100 size=224x100 sar=1:1 dar=56:25 codecs=avc1.42C00D avc profile=66 compatibility=192 level=13
I0.830 video_decoder_avc_mfx: decoded 96 samples with description index 1
I0.831 video_encoder_avc_mfx: encoded 96 samples
Group membership setup
After the above tests succeeded, there is still some further setup required,
since by default only the root user is allowed to access the GPU devices. (This
is why the above tests are all run with sudo.)
Each non-root user which is supposed to be doing hardware transcoding must be
made a member of the video and render groups.
If your user account is called myuser, you should run the following command
to add the group memberships to it:
#!/bin/bash

sudo usermod -a -G video,render myuser
Note that group memberships are only applied for new login sessions, so after this command you should log out and back in again, then check the list of groups you are member of:
#!/bin/bash

$ groups
myuser video render
If the list contains video and render, you should try re-running the
vainfo command, and the unified_capture commands listed earlier, but
without the sudo prefix. These should all succeed.