Using CloudFormation
This tutorial shows how you use Cloudformation to integrate Unified Streaming launched on an Amazon EC2 instance with S3 Storage and Amazon CloudFront to deliver on-demand HTTP streaming sessions globally.
CloudFront can be used for fast streaming of audio and video at scale because it stores the streaming data in its global network of edge locations. When a player application requests a stream from your Unified Streaming server running on an Amazon EC2 instance origin, CloudFront automatically routes the request to the optimal edge location so that the stream is delivered with the best possible performance.
Using the CloudFormation script different types of instances to run Unified Streaming can be selected as well as AutoScaling.
This tutorial is also available as Cloudformation tutorial.
Creating an Amazon Web Services Account and Keypair
If you already have an Amazon Web Services (AWS) account, see Creating an Amazon EC2 Key Pair. If you don't already have an AWS account, use the following procedure to create one.
Note
When you create an account, AWS automatically signs up the account for all services. You're charged only for the services that you use.
To create an AWS account
Go to http://aws.amazon.com, and click Sign Up.
Follow the on-screen instructions.
Creating an AWS CloudFormation Stack for On-demand Streaming
The following procedure uses an AWS CloudFormation template to create a stack that launches all AWS resources required for streaming, including Amazon EC2 instances, Elastic Load Balancer, Amazon CloudWatch alarms, an Amazon CloudFront distribution and an existing Amazon S3 bucket.
Download: autoscaling-vod-http-streaming--with-existing-s3-bucket.cft
Note
There are no AMI's referenced in this cloudformation template.
You will need to add an AMI value from AWS Marketplace (click 'Manual Launch' for IDs) in the 'Mappings' section of the template for the region you are working in (see below), without this the template will fail to create the stack.
"Mappings" : {
    "RegionMap" : {
        "ap-northeast-1"      : { "AMI" : "" },
        "ap-southeast-1"      : { "AMI" : "" },
        "ap-southeast-2"      : { "AMI" : "" },
        "eu-west-1"      : { "AMI" : "" },
        "eu-central-1"      : { "AMI" : "ami-1a1s1d1f1g" },
        "sa-east-1"      : { "AMI" : "" },
        "us-east-1"      : { "AMI" : "" },
        "us-west-1"      : { "AMI" : "" },
        "us-west-2"      : { "AMI" : "" }
If you're interested in using other templates, for instance creating a new S3 bucket or use your own license - please email us at Unified Streaming Contact.
When you no longer need to stream simply delete the stack to avoid more charges. Your Amazon S3 buckets will not be deleted as they potentially contain your media asset library.
To create an AWS CloudFormation stack for on-demand streaming
1 - Create an S3 bucket and upload your content (alternatively use an existing bucket with existing content).
2 - Select your preferred region Region console .
3 - Select 'Create stack' from the cloudformation home page
4 - Add a Stack Name. The stack name must not contain spaces, and must be unique within your AWS account.
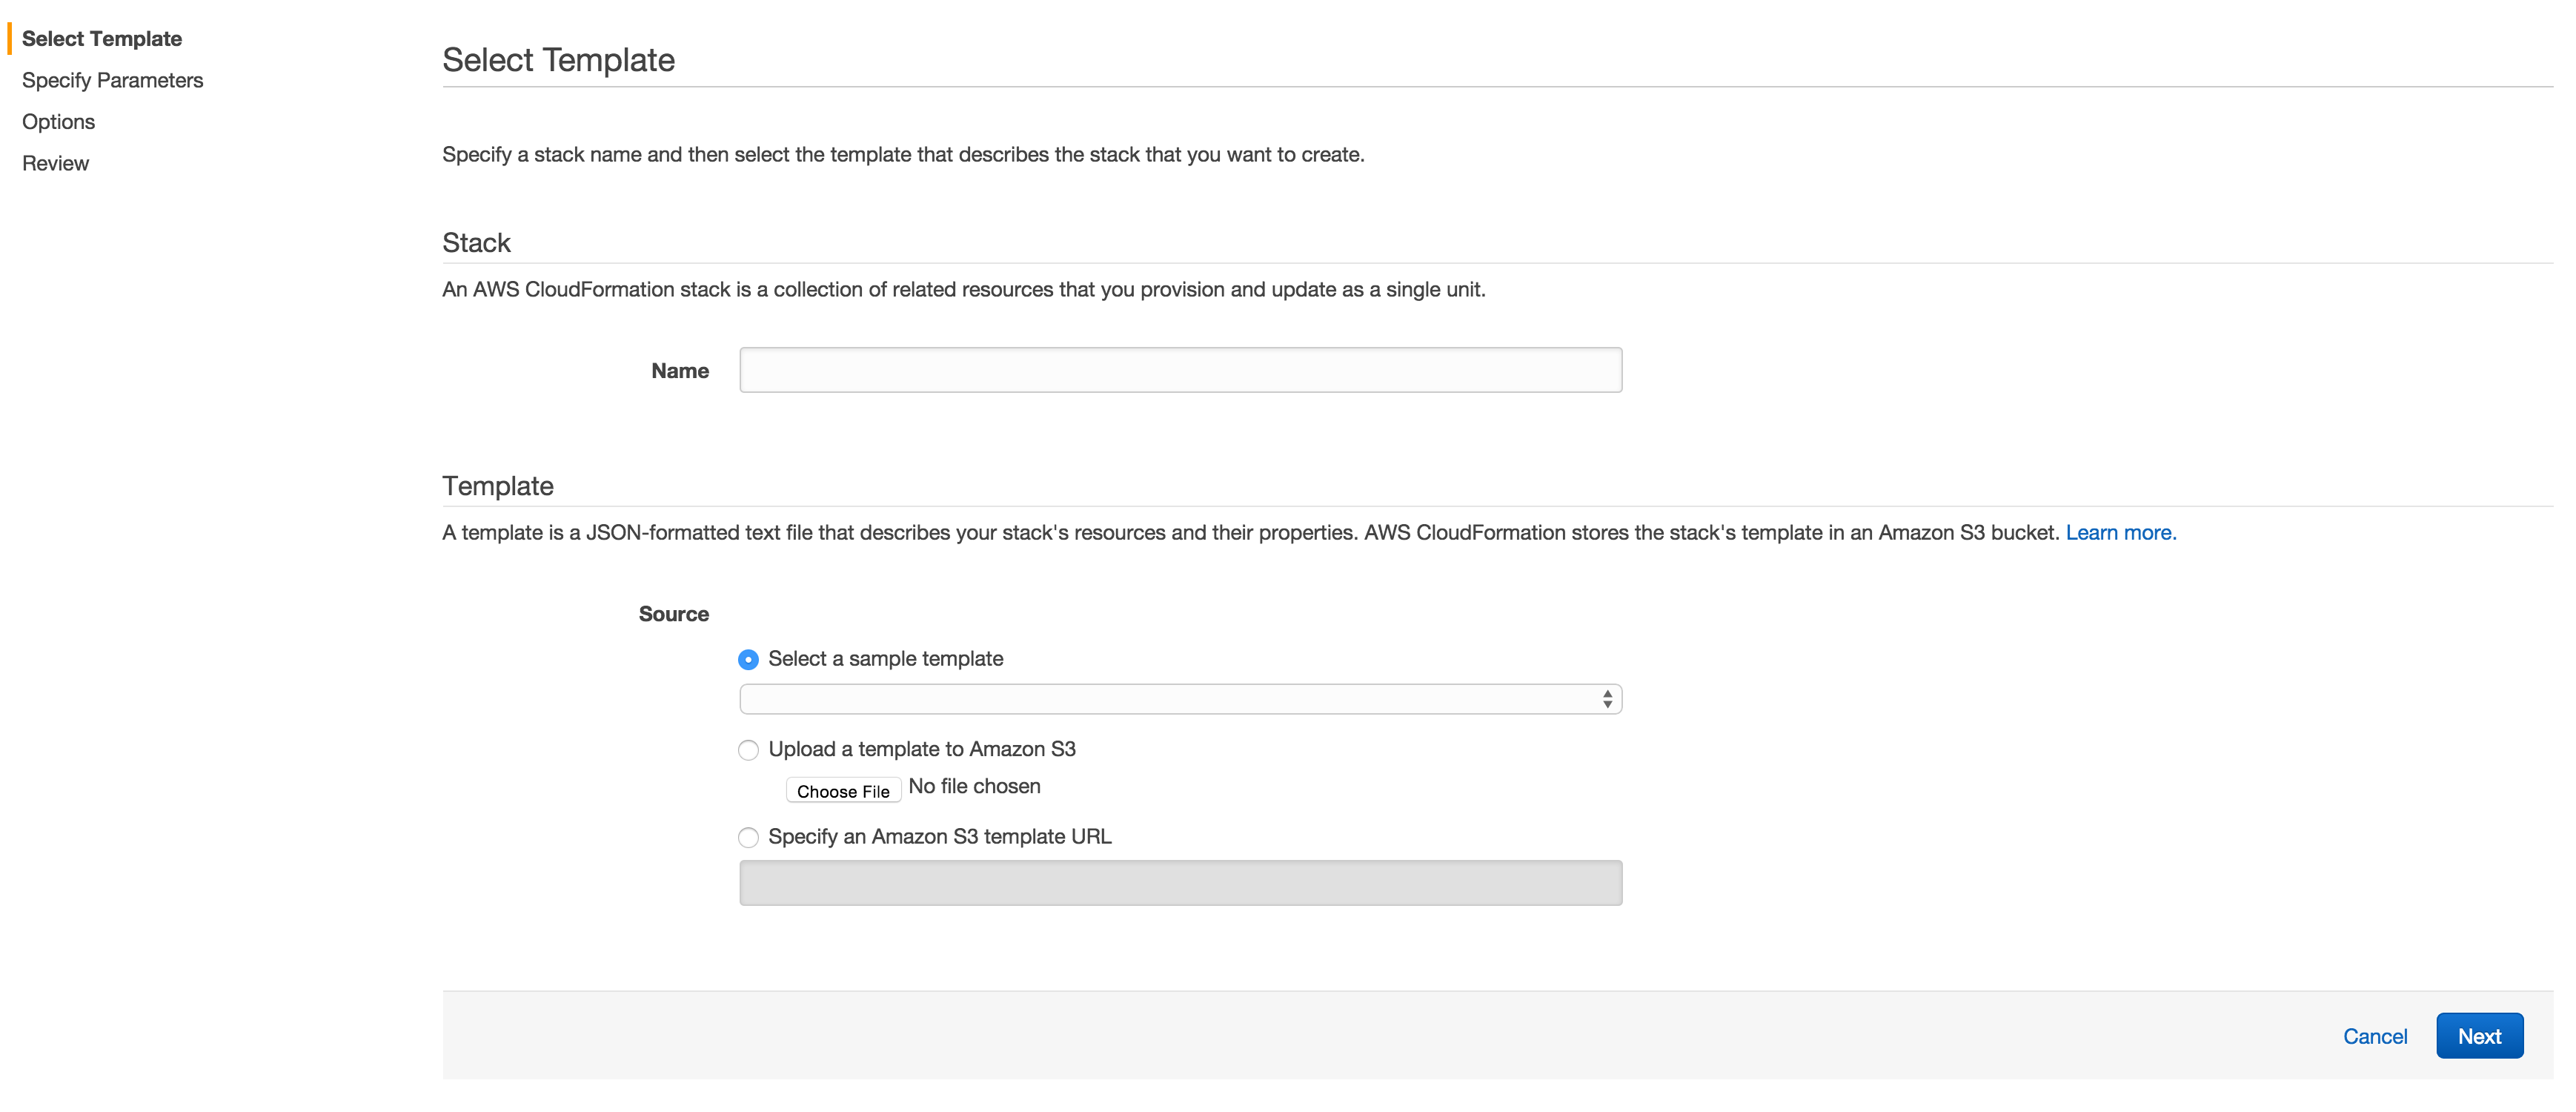
5 - Select a template: use an existing one, upload one or use a sample one.
6 - Optional: To configure SNS notification, to specify how long you're willing to wait for the stack to be created, and to choose whether to roll back changes if stack creation fails, check the Show Advanced Options checkbox, and specify the applicable values.
7 - Click Continue, and the Specify Parameters page of the Create Stack wizard appears.
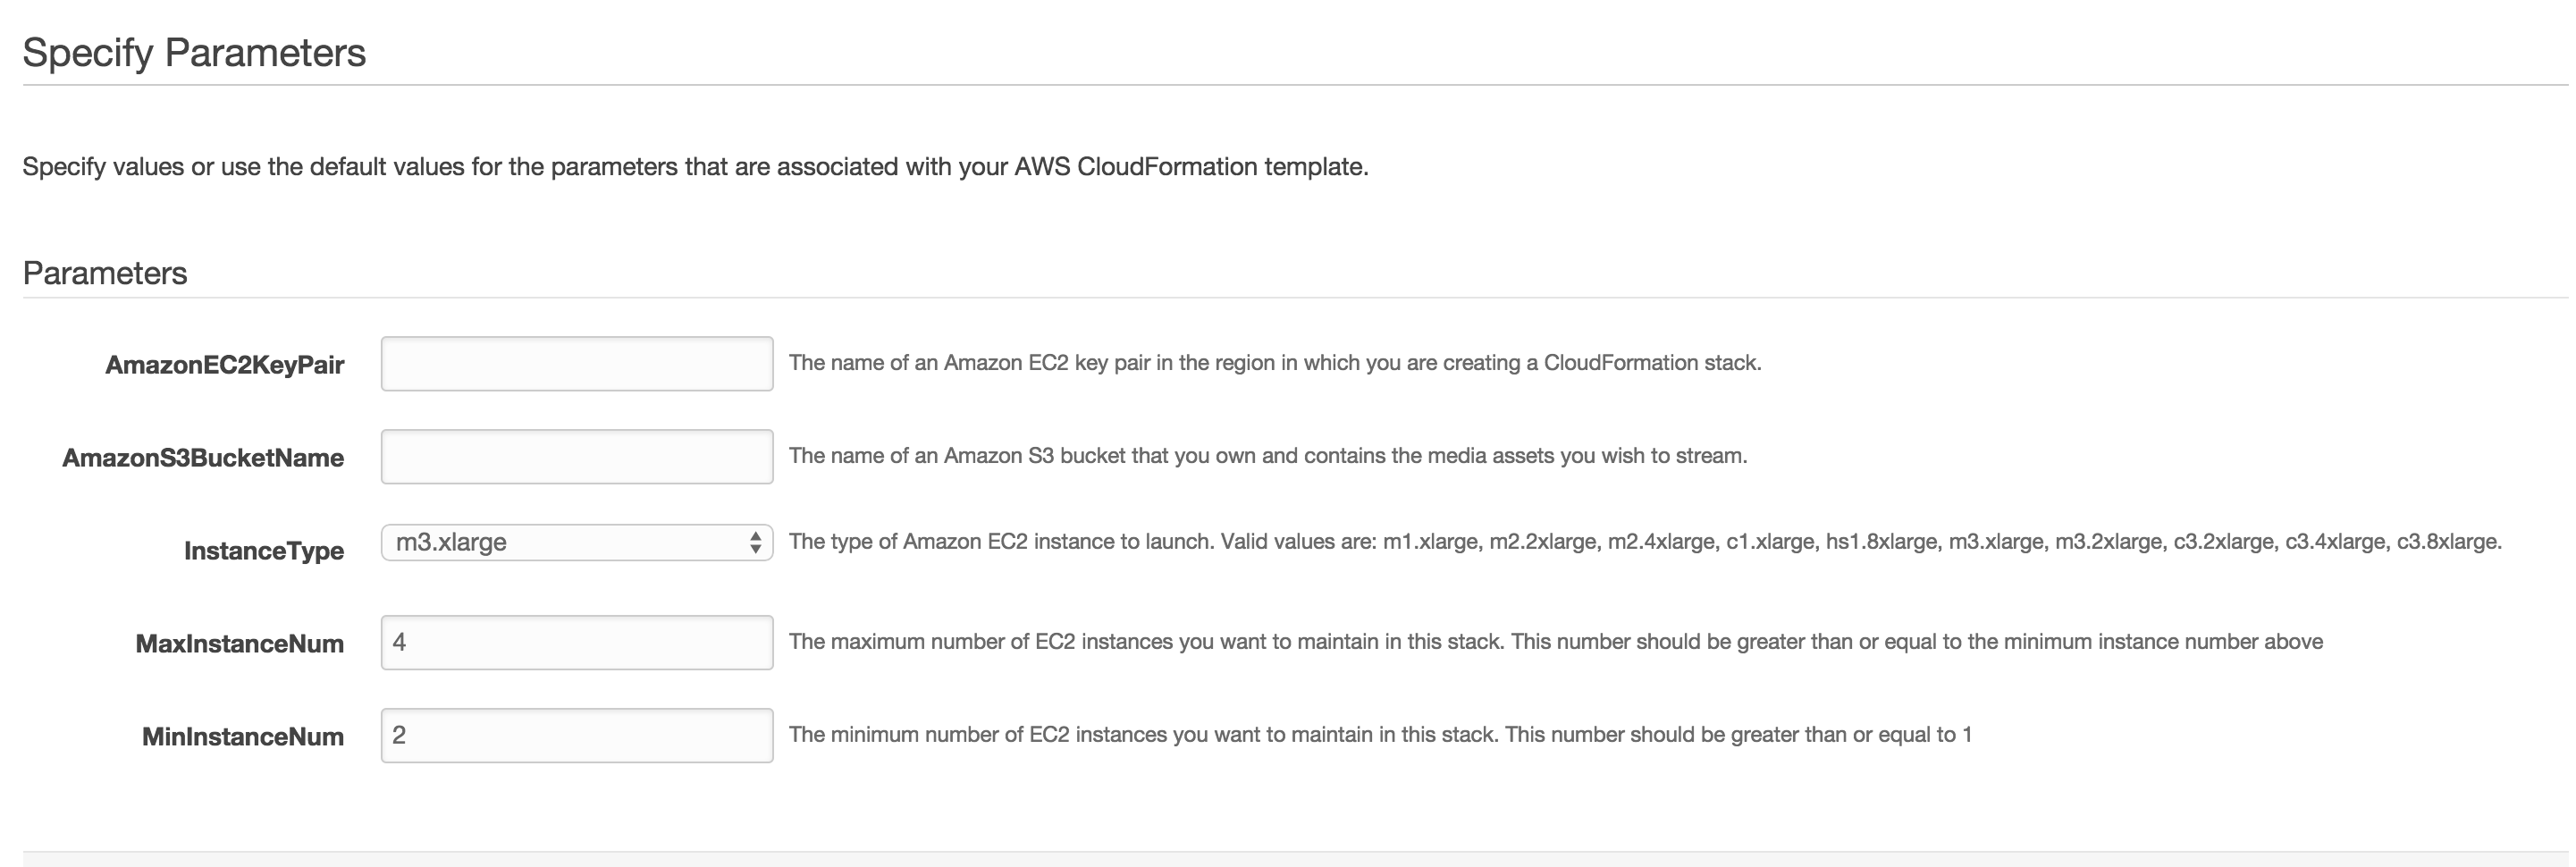
8 - In the AmazonEC2KeyPair field enter the name of an Amazon EC2 key pair in the same region as your stack. The key pair must be associated with the account you are logged in to.
9 - In the MaxInstanceNum field you can override the default value by entering the maximum number of EC2 instances you wish to have running at any given time.
10 - Enter a valid S3 bucket name for AmazonS3BucketName.
11 - In the MinInstanceNum field you can override the default value by entering the minimum number of EC2 instances you want to have running at any given time.
12 - In the InstanceType field enter the Amazon EC2instance type you wish to use, if different from the default, and click Continue. For more information about Amazon EC2 instance types, see Available Instance Types.
13 - Optional: In the next dialog, add the key/value pairs (and tags) for any tags you plan to use. Click Continue.
14 - Review the settings for the stack, click Continue.
15 - Dismiss the stack creation dialog by clicking Close.
Your stack may take several minutes to create. To track the progress of the stack creation, select the stack, and click the Events tab in the bottom frame. If AWS CloudFormation cannot create the stack, the Events tab lists error messages.
When your stack is ready, the status for the stack changes to CREATE_COMPLETE.

Playing the On-demand Stream using a Web Application
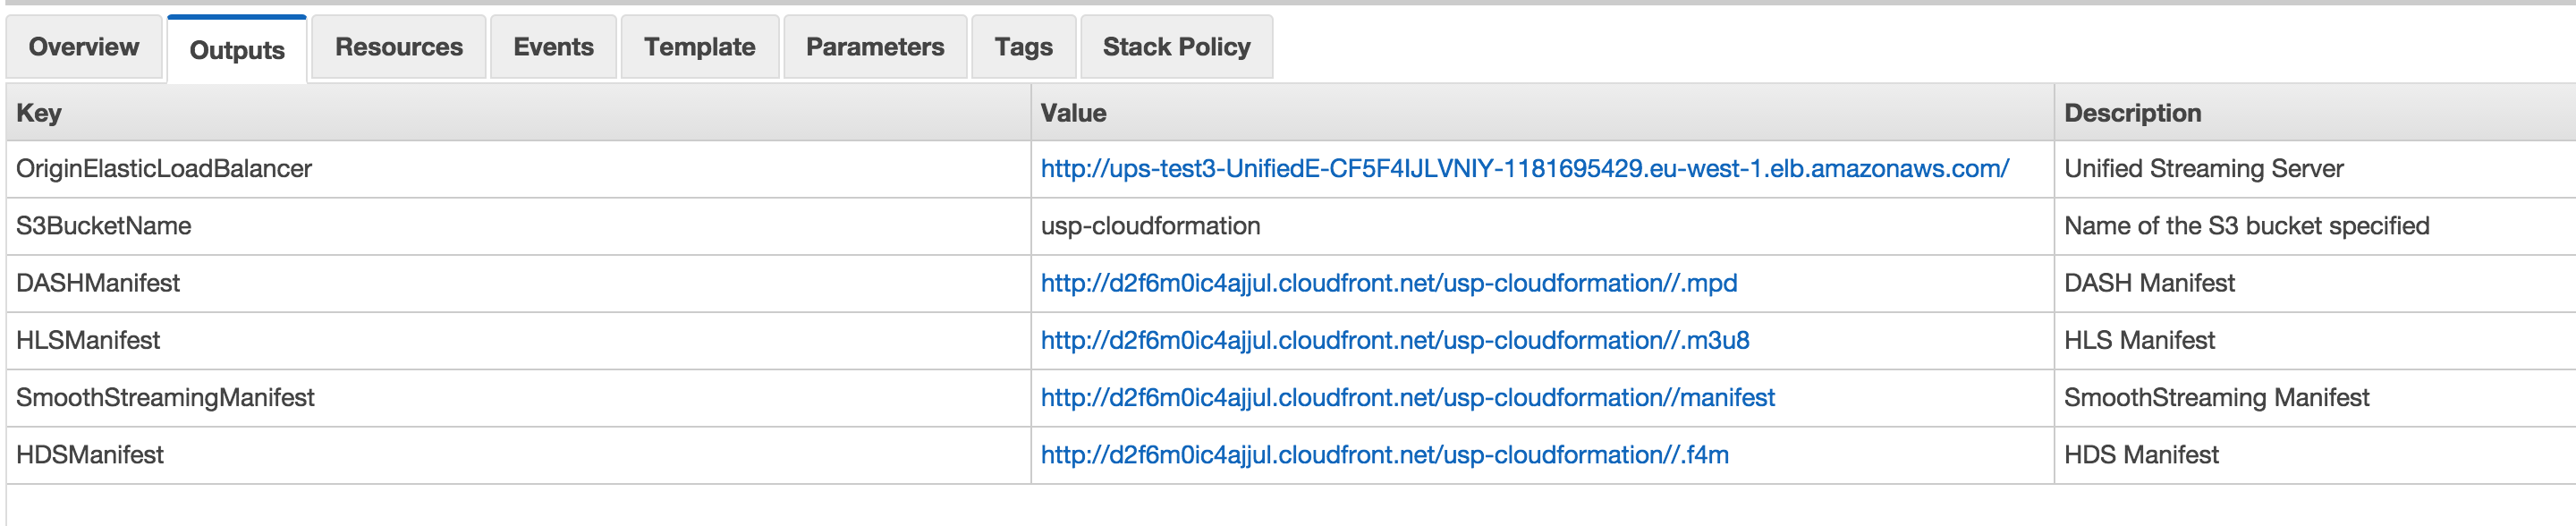
When your stack is created, click the Outputs tab, which displays the stack creation outputs. You will use these values later in the process.
If you have placed your content inside a folder within the bucket, include that folder in the media file path.

In other words, replace the string '<media-file-path-excluding-bucket-name-but-including-the-media-filename>' with the path and filename you want to stream
The content itself has to be open/downloadable by 'everyone'. If you do no want to allow this you can follow Using S3 with Authentication.
To play DASH streams via CloudFront
Step 1, 2 and 3 similar as with Smooth Streams.
4 - Copy the value of the DASHManifest key.
5 - Update the URL with the correct path of the asset in Amazon S3. For example if your bucket name was unifiedhttpstreaming-s3bucket-123abc4 and your media filename is nasa_msl_launch.mp4, then this URL will become
http://d123xyz.cloudfront.net/unifiedhttpstreaming-s3bucket-123abc4/nasa_msl_launch.mp4/.mpd
To play Apple HLS streams via CloudFront
Step 1, 2 and 3 similar as with Smooth Streams.
4 - Copy the value of the HLSManifest key.
5 - Update the URL with the correct path of the asset in Amazon S3. For example if your bucket name was unifiedhttpstreaming-s3bucket-123abc4 and your media filename is nasa_msl_launch.mp4, then this URL will become
http://d123xyz.cloudfront.net/unifiedhttpstreaming-s3bucket-123abc4/nasa_msl_launch.mp4/.m3u8
To play Smooth Streams via CloudFront
1 - Open the AWS CloudFormation console.
2 - Select the checkbox for the stack for on-demand HTTP streaming.
3 - In the bottom pane of the AWS CloudFormation console, click the Outputs tab.
4 - Copy the value of the SmoothManifest key.
5 - Update the URL with the correct path of the asset in Amazon S3. For example if your bucket name was unifiedhttpstreaming-s3bucket-123abc4 and your media filename is nasa_msl_launch.mp4, then this URL will become
http://d123xyz.cloudfront.net/unifiedhttpstreaming-s3bucket-123abc4/nasa_msl_launch.mp4/manifest
To play Adobe HDS stream via CloudFront
Step 1, 2 and 3 similar as with Smooth Streams.
4 - Copy the value of the HDSManifest key.
5 - Update the URL with the correct path of the asset in Amazon S3. For example if your bucket name was unifiedhttpstreaming-s3bucket-123abc4 and your media filename is nasa_msl_launch.mp4, then this URL will become
http://d123xyz.cloudfront.net/unifiedhttpstreaming-s3bucket-123abc4/nasa_msl_launch.mp4/.f4m
Deleting an AWS CloudFormation Stack for On-demand Streaming
When your need for streaming is over, you may delete the stack that you have created. This deletes the AWS resources that were created and stops the on-demand charges for the resources. Please note that the Amazon S3 bucket associated with this stack will not be deleted since it may potentially contain your media assets.
To delete an AWS CloudFormation stack for on-demand streaming
1 - Open the AWS CloudFormation console.
2 - In the upper-right corner of the console, select the region in which the stack is running.
3 - Select the checkbox for the stack, and then click Delete Stack.
4 - Click Yes, Delete to confirm.
5 - To track stack-deletion progress, select the checkbox for the stack and click the Events tab in the bottom frame.